Building a reactive calculator in Haskell (2/5)
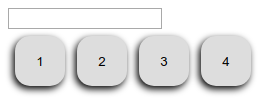
In the first post in this series, we saw how to get started with GHCJS with a Hello world, and how to build a basic reactive application. In this next blog post, we will create a more sophisticated view for our reactive calculator app (Fig. 1).

Figure 1: A beautiful, reactive calculator app we will build in this Haskell for web series.
GHCJS comes with a collection of libraries that allow us to populate an HTML DOM and add the elements we need for the interface. We used some of those in the last example in the last blog post. Although this can be very useful to generate dynamic content, the simplest way to create a static HTML view is to just use HTML and CSS files directly, and then access widgets from Haskell by getting them from the DOM.
Initializing a GHCJS application with static HTML files
We are going to create two files to hold our header and our page body. To make matters simple, we will put the style sheet in the header, but it would be better to put it in a separate CSS file and link to it from the page header.
Create a file data/head.html in your tree with the following content. It currently contains a style entry for a class named “button” that fixes its size, margin, corners, and aligns the text to the center:
Now, create a file data/body.html with the following table with four buttons. Notice how we set the class of the buttons to the “button” class, which refers to the style sheet above. We also give each button a unique ID, which will help us access them from Haskell:
Now, replace the Main.hs in the tree with the following:
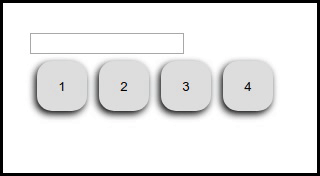
If all went well, when you compile this program with the same instruction as before (cabal install –ghcjs) and reload the tab that had the web page (.cabal-sandbox/bin/keera-hails-demos-small.jsexe/index.html), you should now see the following:
So, the buttons are there, it is picking the right style, but the application is mostly incomplete. Just to show you all the pieces we will need to make this work, we are going to add a minimal internal model, and use it to interact with the view.
Application Models
An application model is an abstract, conceptual representation of the state of the knowledge handled by the application. The view shows part of that model, and lets you apply changes to it. In real applications, it is very important to be able to modify the model concurrently: very often, you will have threads in the background doing other work, or will need to update the model based on a message you get from a different server, and, separately, those changes will have to be reflected in the user interface. Thread coordination between the model and the view can get tricky, since all changes to the view must normally be executed from one and only GUI thread.
In this section, we are going to opt for the simplest solution possible, which is also well supported in Keera Hails: MVars. MVars are mutable variables that can be empty, which enables synchronization and atomicity (for details, see the official documentation or a book). In our framework, one of the solutions supported is to use CBMVars, which stands for MVars with CallBacks, and enables attaching IO operations to MVars that are executed any time the value they hold changes. The concept is very similar to that of an event-handler in Graphical User Interfaces.
Modify the Main to contain the following:
This main does a lot of things, so let’s try to understand it step by step. Lines 25-30 remain unchanged, so there is nothing new there. Lines 33 and 34 obtain a input element from the DOM by its ID “myinput”, and cast it to an HTMLInputElement. This operation will fail if the casting fails or if an element with that ID does not exist. (If that happens, you will see an exception printed to the javascript console in your browser.) Line 36 is a reactive definition:
let inputFieldText = inputTextReactive inputField
This operation creates a reactive value that projects the text of the input field. If the field changes (e.g., because the user types text), so does the reactive value. The specific type of this variable inputFieldText is ReactiveFieldReadWrite IO String but, more generally, you can think of it as an instance of the class ReactiveValueReadWrite. Most operations in the Keera Hails library operate using the class interface, and reactive fields are just one possible type of reactive value. What is more important about this line is to understand that operations that interact with the reactive value will be in the IO monad (we are already in that monad, so that requires no changes), that the value it holds is of type String, and that it can both be changed and read (Read/Write).
Lines 40-41 are similar, except that they define this as part of an auxiliary operation defined in line 39 (because we have many buttons).
  let constReactiveButton xid xval = do
        button <- uncheckedCastTo HTMLButtonElement <$> fromJust
                    <$> getElementById doc (xid :: String)
        return $ const xval <^> htmlElementClick button
They cast the element to an HTMLButtonElement, and use the argument xid as the
ID of the element in the HTML page. As part of the same operation, we do two
more things. First, we project the event of clicking the button as the reactive
value. That’s right: it will be a value that will produce a new unit value ()
every time the user clicks on the button. Second, we transform that useless
() into a number corresponding to that button. We do so by applying const xval to the reactive value, for which we need the function (<^>) that we saw at the end of the last tutorial.
Lines 46 and 47 simply apply that auxiliary function to 4 pairs of values (“num1”, 1), (“num2”, 2), etc. Notice how we are using mapM to collect the results, so nums will be a list of read-only reactive values holding values of type Int.
  nums <- mapM (uncurry constReactiveButton)
            [ ("num" ++ show x, x) | x <- [1..4] ]
The next line, 50, defines the model as a reactive model built from a mutable variable with callbacks, as discussed before. This variable is read-write, IO, holds an Int, and is initialized to 0.
model <- cbmvarReactiveRW <$> newCBMVar 0
The next line is where “the action happens”, where the reactive aspect of the application takes place. The first line:
inputFieldText <:= (show <^> model)
synchronizes the model and the text field, such that changes to the value in
the model will be converted from Ints into strings with the function show and
propagated to the text field. On the right hand-side of the reactive-rule
building function (<:=), the expression (show <^> model) creates a
read-only RV that contains the number in the model as a string. Notice how we
use the function (<^>) to apply the function show to it, and that the
original model is read-write, while the result is read-only. (This is also why
we cannot use the functor’s fmap (<$>) to apply that transformation.) Then,
the application of (<:=) states that the inputTextField will reflect the
value in that new read-only RV. This direction of communication is possible
because both reactive values operate on the same monad (IO), hold values of
the same type (String), the left one is writable, and the right one is
readable. If you invert the arrow (=:>) , you will get a compilation error,
because it does not know how to convert the string back to a number.
At this point, the last 2 lines should be self-explanatory. For all the reactive buttons we have, each of which will produce a number when the button is clicked, we will pass that on-to the model. So, whenever a button is depressed, the value will be sent to the model and overwrite it.
  forM_ nums $ \button ->
    button =:> model
If you compile and run now, you should be able to interact with the page and make numbers appear in the text box.
Before we close this step in the series, we want to introduce a new function
to apply to a reactive value: modRW. While (<^>) allows you to transfom
the value that comes into an RV, modRW allows you to transform the incoming
value and the value already existing in the RV and combine them to produce a
new value for the RV. To see it in effect, modify the last line to read:
forM_ nums $ \button ->
    button =:> modRW (+) model
If you recompile and run now, you will see that values are not substituted, but added to the existing one. This is because modRW is using (+) to adding the number already in the model to the value that comes from the button, and is putting the result back into the model.
We already have all the pieces that we need to finish our reactive calculator. At this point, you should be able to create your own HTML elements, connect to them from Haskell, and expose their attributes and events as reactive values connected to other RVs via reactive rules. In the next posts in the series we will see how to complete the user interface, how to complete the model, and how to structure the application so that we can run on desktop by changing just one module.
You can continue with the next post in this series here.